Formatting Text
Adding text to your page is as simple as clicking the 'Edit' link (top of the page, on the left side of the Blue Control Bar), typing text into any blue outlined space and clicking the Publish button (top right of the page - also blue).
However, you will want to do more than just type text.
Suggestion: add your text first, then format it.
Use the Enter key to start a new paragraph.
Resist the urge to add line breaks, but if you must . . .
Your website is designed to adjust the width of your website based on the width of the screen on which your site is displayed. It will wrap the lines of your text differently depending on whether that screen is a smart phone, a big screen TV, or any size in between. What looks good on the screen you're working on may not look so good on a different size screen. Let the system do the line wrapping.
If you have a great reason for using line breaks - like adding an address - hold down the Shift key while clicking the Enter key.
For example: (Enter Key here starts new paragraph)
SimpleUpdates.com (shift / enter key)
P O Box 270 (shift / enter key)
Berrien Springs, MI 49103 (shift / enter key)
269.473.3687 (enter key)
A New paragraph begins.
Formatting
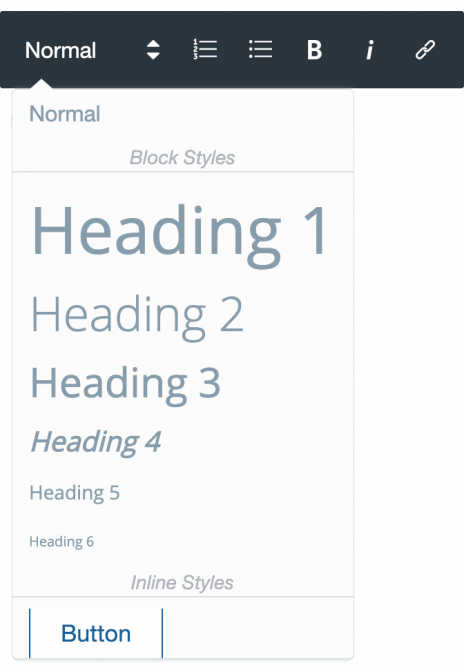
When you select (highlight) text, a Format Bar will display and offer you several options.

Text Size and Styles
Click 'Normal.' A dropdown menu will offer you several options

Normal - is the default. Normal is what most of the text on your website should look like. Normal is what you may want to click if you have changed your mind about a heading, or have pasted text from a word processor and it is not displaying as you expected.
If the Normal size of the text is too big or too small, there is a simple code adjustment that will change it for the entire website. Tech Support will be happy to assist you with that adjustment.
Headings - The heading options not only give you six different text sizes - and potentially styles - to choose from they are also specific styles that are Search Engine Optimization friendly.
Button - The Button option will turn selected text into a button. For Example:
Here's a button
Buttons are designed to match your theme, so your buttons will likely look different than this sample one.
Keep in mind that this is just text formatted to look like a button. If you want your button to actually be clickable and do something, you will have to use the linking option.
Note: The headings are called 'Block Styles' This means that wherever you use these styles, the entire paragraph will become a heading.
The Button style is an 'Inline Style" meaning that you can use it in the middle of a paragraph without the entire paragraph becoming a button, but it may not look all that wonderful in the middle of a sentence.
Bullets
You have the option of an Ordered List -- a list with numbers, or an Unordered List - a list with bullets.
To create a list, enter your text. Click the 'Enter' key each time you want to start a new bullet point. When you are finished entering the text, select (highlight) it and click the icon for numbers or bullets.
You may add to the list by using the 'Enter' key at the end of the bulleted paragraph before the space where you want to add the bullet.
When adding to a list that is already created, the system will suggest the next number or bullet. If you don't want it, just click 'Enter' a second time to cancel the list.
Note: sometimes when making changes to the list you'll notice it isn't behaving the way you expected. When this happens it usually helps to select the entire list, turn the bullets off by clicking them on the format bar, then turn them back on again.
'B' is for Bold - 'I' is for Italic.
Not much more to say about that! Select the text, click the letter.
The Bullets, Bold and Italic are toggle buttons. If you look carefully you will notice that when they are active the back ground is a slightly lighter gray. Just click them again to turn them off.
Creating Links
The last option on the Format Bar is for linking. Please click - Creating Links - for instructions.
Related Information
Formatting Text
Creating Links
Blocks
History and Autosave
Tabs
Home Layout Editing
Group Pages
Understanding Pages
Adding a New Page
Editing an Existing Page
Don't Stay Invisible.
Get noticed. Don’t blend into the background.
Take action today and start building.
© Copyright 2002-2025 SimpleUpdates.com Inc., All Rights Reserved
About
Acceptable Use Policy
Privacy Policy
Terms of Service


